Mosaics and mosaic making information from The
joy of shards Mosaics Resource
Calculating quantities of tiles for the mosaic
Just how many tiles do you need to make a five-foot (1.5 metre) high mermaid? To get an overall idea of the quantity of tiles needed to fill a standard shape, a good start is to work out the area to be covered and divide this by the area of a single tile. This is never going to be an exact science! Some of the area of the mosaic will be made up of grout and breaking tiles down into smaller units increases this proportion. On the other hand, if the tiles are being cut there is bound to be some waste. This will include bits you cut off to shape a tile, as well as tiles that get written off because they don't break the way you wanted them to.
Things get a little more complicated where you have an irregular shape, as in this project. Also, you don't only need to know the total number of tiles. You also want to know the amounts you will use in different colours. You don't want to run out of one kind of tile because you haven't bought enough, or order more than you can use. Also some colours of tiles may cost more than others, so you need to do your calculations to work out the cost of materials. Knowing the overall area will let you calculate the cost of adhesives and grout needed, too.
There are tile calculators available which will help you in this. For example: Tile calculator 1 | Tile calculator 2 and also software for more detailed analysis: Tile Creator

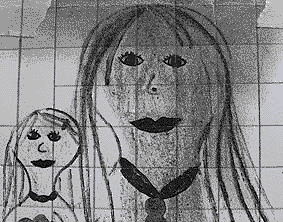
To calculate how many tiles I needed of the various different colours, I had to know the areas of the different coloured sections of the mermaid - the skin, the tail, the rocks etc. I used a fairly crude method - I photocopied the design, cut out the different sections and drew their outlines on graph paper. Then I used the squared paper to work out the area of the cut-out sections (each square on the paper was 1 centimetre squared - the number of squares covered gave me the area in cm2).
Next I had to scale this up. The original design was 21 cm (roughly 8 and a quarter inches) high. The mosaic figure was to be 1.52 metres (5 feet) tall. Dividing 152 centimetres by 21 (or 60 inches by 8.25) gives a figure of around 7.25. This means that the finished mermaid would be 7.25 times as tall as the design. That ratio allowed me to also calculate the width of the backing board I would need (by measuring from the design and multiplying up).
However, to calculate the areas I had to remember that these are 2-dimensional and so would need to be multiplied by 52.5 (which is 7.25 x 7.25). So, for example, as the rocks covered 48 of the 1 centimetre squares on the graph paper, the mosaic rocks would cover a total of 2520 cm2 (48 x 52.5).
How many tiles would be needed for the rocks? The tiles were 2x2 cm, or 4 cm2 each. Dividing 2520 by 4 gives a figure of 630 tiles. As I would be buying the tiles in sheets of around 225 tiles per sheet, I would need at least 3 sheets (630/225 = 2.8). I decided to allocate 4 sheets for this, in order to allow for contingencies and to get 4 colours to use in the rocks.
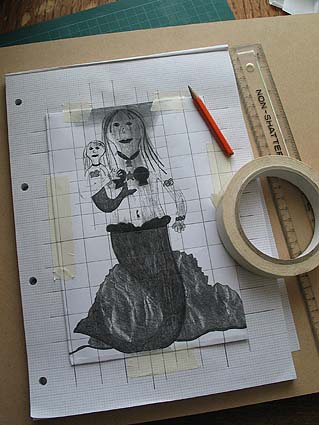
I also needed to scale up the original design to its full size. To help with this I taped a copy of the design to graph paper and used the graphing lines to draw a grid of squares on the design. This would allow me to easily copy the contents of each square (by hand) to full size. In the final version each of these squares would be 7.25 times taller and 7.25 times wider, so a 2 x 2 centimetre square on the graphing paper would be 14.5 x 14.5 cm.
I opted to transfer the design to the backing board in the first instance. This had some advantages, but I could perhaps have saved time by transferring the design directly to the brown paper. I drew a grid of 14.5 cm squares onto the wood and copied in the details of the design. This is a standard artists' method for copying and rescaling designs. Of course, if I was transferring it to the brown paper, I would need to remember to produce a mirror image of the original. Unless fine detail is required, this can be done by creating a right-way-round version in thick marker pen. This shows through the brown paper, so you just have to flip the paper over to reverse it.
I was now ready to order and prepare
the tiles and do a trial layout
of the design.
The pictures below show how a grid can allow you to break a picture down into manageable units for reproducing it. If you'd like to quickly practise this technique, take a picture postcard and try copying in at double size, first freehand and then using a grid.